
Have you been thinking about canceling your Starlink subscription but worried the process might be complicated? Many users sign up for the reliable satellite internet, especially in rural areas, then later need to pause or stop service when they move, switch providers, or simply want to cut costs.
The truth is, canceling your Starlink subscription is designed to be straightforward and penalty-free in most cases. You can do it yourself in just a few clicks without calling support or dealing with long hold times.
You’ll learn exactly how to cancel Starlink subscription on the website and mobile app, what happens to your service and hardware afterward, and smart options like pausing if you might need it again later.
Why People Choose to Cancel Their Starlink Subscription
Starlink offers fast internet almost anywhere, but life changes. Some users cancel because they’re moving to an area with fiber or cable. Others find a better deal or only needed temporary service during a project or trip.
Here are the most common reasons readers decide to end their Starlink service:
- Relocating to a new home with different internet options available
- Wanting to reduce monthly expenses during a tight budget period
- Taking an extended break from a second home or RV setup
- Switching to another provider after testing Starlink
- No longer needing the high-speed connection for work or streaming
Whatever your reason, Starlink makes it easy to cancel without long-term contracts in most plans. You simply stop the recurring charges while keeping ownership of your hardware.
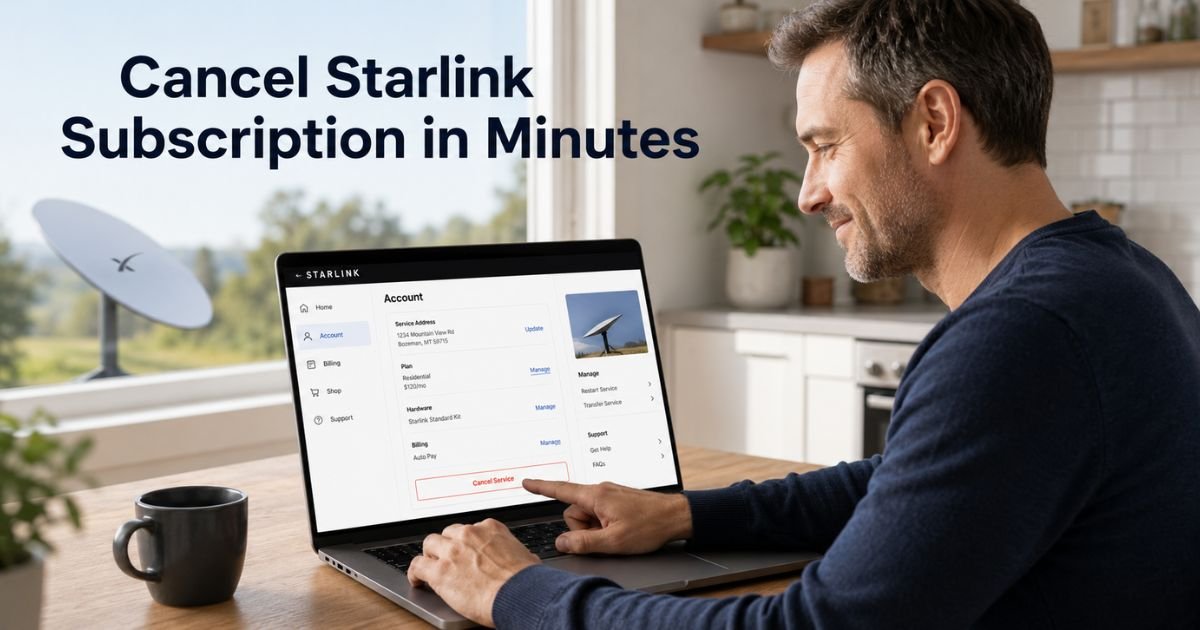
How to Cancel Your Starlink Subscription: Step-by-Step
The easiest and most reliable way is through the official Starlink website. This method works on any computer or phone browser.
Follow these simple steps:
- Go to starlink.com and log into your account using the email tied to your service.
- On the Home page, look for the section labeled Your Subscription.
- Click Manage next to the service plan you want to cancel.
- Scroll or look for the Cancel Service button and select it.
- Follow the on-screen prompts to confirm your cancellation.
Once you complete these steps, your service will continue until the end of your current billing period. After that date, the recurring charges stop automatically.
You can also cancel directly in the Starlink mobile app. Open the app, go to the main menu, tap Subscriptions, select your service line (it usually starts with “SL”), and choose the cancel option from there.
Pro Tip: Check your current billing cycle date before you cancel. If your next payment is coming up soon, canceling now can help you avoid paying for another full month you won’t use.
What Happens After You Cancel Starlink Service
Your internet access does not shut off the same day you cancel. You keep full service until the end of the billing period you’ve already paid for. After that, the connection stops and you won’t be charged again.
Take Mark, a 42-year-old contractor who used Starlink at his remote job site. When the project ended, he decided to cancel. He followed the website steps on a Friday afternoon.
His service stayed active for the remaining two weeks of his billing cycle, giving him time to wrap up work and download any final files. Once the period ended, billing stopped completely and he kept his dish and router for future use or resale.
You own your Starlink hardware even after canceling service. There’s usually no requirement to return the kit unless you bought it under a special financing or rental program. You can store it, sell it, or reactivate service later if needed.
Pause vs Cancel: Which Starlink Option Is Right for You?
In some cases, Starlink offers a pause option instead of full cancellation. Pausing can be helpful if you’re traveling for a few months or temporarily don’t need service.
Here’s a quick comparison to help you choose:
Pause vs Cancel Your Starlink Subscription
| Feature | Pause Service | Cancel Service |
|---|---|---|
| Monthly charges | Temporarily stopped | Stop at end of current billing period |
| Internet access | Paused during the period | Continues until billing period ends |
| Easy to restart | Usually simple reactivation | Requires resubscribing and possible wait |
| Best for | Short-term breaks or seasonal use | Permanent changes or moving |
| Hardware | Stays with you | Stays with you |
| Fees | Typically none | Typically none (check your plan) |
If a pause option appears in your account, it’s often the smarter choice for temporary situations. Otherwise, full cancellation works cleanly for most people.
Common Mistake: Some users assume they must return their Starlink dish and router right after canceling. That’s not usually required. You keep the hardware you purchased. Only return it if Starlink specifically asks or if you’re in a rental/lease program.
Troubleshooting Common Starlink Cancellation Issues
Most cancellations go smoothly, but here are a few things that can trip people up:
- Can’t find the cancel button? Make sure you’re logged into the correct account and looking under “Your Subscription” on the website.
- Using the app and options are missing? Try the website version instead — it usually shows more details.
- Worried about early termination fees? Check your specific plan details in your account. Most current residential and roam plans allow cancellation anytime without penalty.
- Still seeing charges after canceling? Wait until the end of your billing period and check your email for confirmation.
If something looks off, Starlink support is available through your account dashboard. You can also review your order history and plan terms there.
Managing Starlink Hardware After Cancellation
Once your service ends, your dish and router remain yours. You can:
- Store the equipment safely for future use
- Sell it privately (many people buy used kits)
- Reactivate service later by logging back into your account and resubscribing
If you ever want service again, simply log in, choose a plan, and reactivate. Your hardware usually works without needing new equipment.
FAQs About How to Cancel Starlink Subscription
Q: How long after I cancel my Starlink subscription will billing stop?
Billing stops at the end of your current paid billing period. You keep full service until that date, then charges end automatically. You’ll usually receive a confirmation email right after you complete the cancellation.
Q: Can I reactivate Starlink service after I cancel my subscription?
Yes, you can reactivate later. Log back into your Starlink account, choose a service plan, and turn service back on. Your existing hardware typically works, though availability in your area and any wait times depend on current demand.
Q: Do I need to return my Starlink dish and router when I cancel service?
In most cases, no. You own the hardware you purchased, so you can keep, store, or sell it. Return the equipment only if you’re in a special rental program or if Starlink support specifically requests it during your cancellation process.
Conclusion
Canceling your Starlink subscription is a simple, self-service process that puts you in control. You can do it on the website or app, keep your hardware, and avoid unnecessary fees in most situations.
The key points to remember are to cancel through your official account, understand that service runs until the end of your current billing cycle, and consider pausing first if you might need internet again soon.
If it’s time to make a change, log into your Starlink account today and follow the steps. You’ll have clarity and peace of mind in just a few minutes. Your future self will thank you for handling it smoothly.
Disclaimer: This content is for informational and educational purposes only and does not constitute professional, financial, legal, or medical advice. The information provided may not apply to your specific situation. Always consult a qualified professional for personalized guidance.